The Parameter Engine
The Paracore Parameter Engine is the specialized component that orchestrates your tool's user experience. It works in tandem with the CoreScript Engine and the Paracore UI to "read" your C# code and project a functional UI without any separate design phase.
The Philosophy of Inference
The Parameter Engine operates on the principle of Inference. Instead of defining UI components manually, it infers the interface from your data types and naming conventions:
- Type-to-UI Mapping: A
boolbecomes a toggle; aColorbecomes a picker; aList<Wall>becomes a multi-select checkbox list. - Constraint Projection: Attributes like
[Range(0, 100)]or[Unit("mm")]are projected as sliders and unit-aware inputs. - Convention Linking: A property named
MyParam_Optionsis automatically linked as the data provider forMyParam.
The Params Pattern
To define parameters, create a public class named Params at the bottom of your script. Every public property with both a getter and a setter in this class is automatically detected and rendered.
// --- LOGIC ---
var p = new Params();
Println($"Processing: {p.ProjectName}");

// --- TYPES ---
public class Params
{
    /// <summary>
    /// This summary appears as a tooltip in the UI.
    /// </summary>
    public string ProjectName { get; set; } = "New Project";

    public int NumberOfIterations { get; set; } = 5;
}
Integrated UI Mapping
In Paracore, your C# properties are more than just variables—they are UI Renderings.
| C# Type | UI Component | Usage |
|---|---|---|
string | Text Input | Free-form text or IDs |
bool | Toggle Switch | On/Off flags |
int / double | Numeric Field | Mathematical inputs |
Color | Color Picker | Visual properties |
T (Revit Class) | Searchable Dropdown | Single selection |
List<T> | Checkbox List | Multiple selection |
Automatic Revit Data Extraction
The "Magic" of Paracore is how it automatically bridges the Revit Database with your script. When you define a Revit class as a parameter, the engine performs the complex task of finding and resolving those elements for you.
- Single Selection (Dropdowns):
Use a single Revit type. Paracore automatically lists all elements of that type in a Searchable Dropdown.
public WallType MyWallType { get; set; } // Paracore handles the extraction
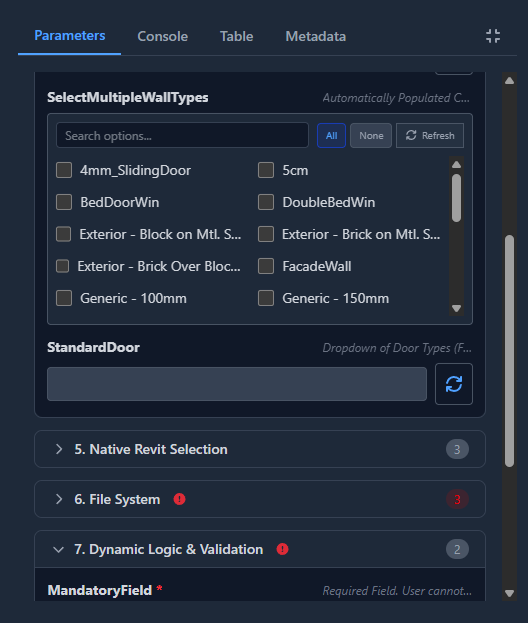
- Multiple Selection (Checkbox Lists):
Use a collection. Paracore lists the elements in a Virtualized Checkbox List, optimized for thousands of elements.
public List<Level> ProjectLevels { get; set; } // Automatic extraction
Professional Curation: _Options Providers
The {ParameterName}_Options provider gives you the professional tools to curate exactly what your users see. This allows you to build specialized tools that go beyond simple element listing.
Why use an Options Provider?
The automatic data extraction is the "Magic" of Paracore—it's the fastest path to getting correct Revit data into your script.
1. Automatic Discovery (The Base Magic)
By default, Paracore handles the heavy lifting of finding every single element in your project that matches the type you define. You don't need to write any collector code—it just works.
public class Params {
    // UI instantly lists every WallType in the project
    public WallType MyWallType { get; set; }
}
2. Professional Curation (Filters)
If automatic discovery is too broad, you can use an _Options provider to create a curated list. This is perfect for when your tool only needs specific items (e.g., only "Generic" wall types).
public class Params
{
    public WallType MyWallType { get; set; }

    // CURATION: Narrow the list to show only "Generic" types
    public List<WallType> MyWallType_Options => new FilteredElementCollector(Doc)
        .OfClass(typeof(WallType))
        .Cast<WallType>()
        .Where(wt => wt.Name.Contains("Generic"))
        .ToList();
}
3. Magic Hydration Predicates (NEW)
V4.2.0 introduces Predicates, allowing you to filter the automatic element discovery without writing a full collector. Simply define a boolean method with the _Filter suffix.
public class Params
{
    // Paracore finds every Room...
    public Room TargetRoom { get; set; }

    // ...but only lists those that pass this predicate (e.g., Area > 100)
    public bool TargetRoom_Filter(Room r) => r.Area > 100;
}
4. Custom Data Extraction (Strings & IDs)
The _Options provider is also the definitive way to handle custom data, like element names or IDs, rather than the objects themselves.
public class Params
{
    /// Choose a Wall by its Name
    public string SelectedWallName { get; set; }

    // Custom Extraction: Gather all unique wall names in the project
    public List<string> SelectedWallName_Options => new FilteredElementCollector(Doc)
        .OfClass(typeof(Wall))
        .Cast<Wall>()
        .Select(w => w.Name)
        .Distinct()
        .ToList();
}
The Compute Action Button
The way you define your provider determines if the data is ready instantly or requires a manual refresh via the Compute action button.
Important: Even with automatic extraction, you must click the Compute action button to list elements. This ensures Paracore only queries the Revit database when you are ready.
public class Params
{
    public List<string> Apps { get; set; } = ["Dynamo", "Rhino"]; // Defaults

    // PATTERN A: Static Initialization
    // UI is ready instantly. NO "Compute" action button appears.
    public List<string> Apps_Options = ["Paracore", "Dynamo", "Revit", "Rhino"];

    // PATTERN B: Dynamic Logic (The Getter)
    // Paracore detects logic and renders the "Compute" action button
    // to ensure the UI remains fast during data-fetching.
    public List<string> Apps_Options
    {
        get
        {
            var list = new List<string> { "Paracore", "Dynamo", "Revit", "Rhino" };
            return list.OrderBy(n => n).ToList();
        }
    }
}
Execution
Once you have finished configuring your parameters, locate the Run Script button at the very bottom of the Parameters tab.

- Validation: The button will be disabled if any
[Required]or[Mandatory]fields are empty. - Feedback: An Execution Status icon (✅/❌) appears once the script finishes.
Parameter Attributes
Attributes allow you to enforce constraints, curate UI behavior, and add logic to your parameters.
1. Validation & Constraints
Enforce data integrity before a script starts.
| Attribute | Description |
|---|---|
[Required] / [Mandatory] | Prevents execution if the field is empty or null. |
[Range(min, max, step)] | Enforces numeric bounds. Renders as a slider by default. |
[Min(val)] / [Max(val)] | Enforces a single-sided numeric bound. |
[Unit("code")] | Handles Unit Conversion. Appends unit to the name. |
[Pattern("regex")] | Validates text input against a Regular Expression. |
[Confirm("WORD")] | Safety Lock. Requires the user to type the exact word to run. |
2. UI Enhancement
Change how a parameter is rendered in the Paracore sidebar.
| Attribute | Description |
|---|---|
[Segmented] | Replaces a list/dropdown with Horizontal Buttons (Segmented Control). |
[Stepper] | Adds +/- buttons to numeric inputs for precise stepping. |
[Color] | Replaces a text/int input with a professional Color Picker. |
[Suffix("text")] | Appends a static label or unit code to the right of the input box. |
3. Conditional Logic
Control the visibility or state of a parameter based on other inputs.
| Attribute | Description |
|---|---|
[EnabledWhen("Name", val)] | Enables this input only when another parameter matches a value. |
[VisibleWhen("Name", val)] | Shows this input only when another parameter matches a value. |
4. File & Folder System
Standard Windows dialogs for path selection.
| Attribute | Description |
|---|---|
[InputFile("filter")] | File picker (Open). Filter example: "csv,txt". |
[OutputFile("filter")] | File picker (Save). |
[FolderPath] | Standard folder selection dialog. |
Selection Attributes ([Select])
| SelectionType | Data Type | Result |
|---|---|---|
Point | XYZ | Returns the coordinates of a clicked point. |
Element | Wall, Door, etc. | Returns the Revit Element object. |
Face | Face | Returns the selected Face object. |
Edge | Edge | Returns the selected Edge object. |
Reference | Reference | Generic reference. Requires [Select(SelectionType.Face)] to specify target. |
📖 API Reference: Detailed documentation of every extension method and global object can be found in the Paracore Extension Methods.
Contextual Providers (Suffixes)
Beyond _Options, you can drive dynamic UI behavior by defining properties with these specific suffixes:
| Suffix | Type | Description |
|---|---|---|
_Visible | bool | Visibility Provider. Shows or hides the parameter dynamically. |
_Enabled | bool | Enablement Provider. Disables the input field. |
_Unit | string | Unit Provider. Dynamically sets the conversion unit code. |
UI Organization and Tooltips
Documentation (Tooltips)
Paracore reads standard C# XML comments to generate tooltips for your users:
- Single Line: Use
/// Your description. - Multi-Line: Use
/// <summary> Your description </summary>.
Grouping (Regions)
Wrap your properties in #region GroupName ... #endregion to create expandable UI sections.
public class Params {
    #region Geometry
    /// Set the offset distance
    [Unit("mm")]
    [Stepper]
    public double Offset { get; set; } = 100;
    #endregion
}
Next: Explore Global Helpers for document and transaction management.