Interactive REPL (BIM Laboratory)
The Paracore REPL (Read-Eval-Print Loop) is a persistent C# scratchpad with direct, real-time access to the Revit API and Paracore's high-level automation helpers. It is designed for iterative API discovery and rapid data exploration.
Interactive Modes
The REPL is located in the Console Tab and provides two mutually exclusive entry modes designed to toggle based on your active task:
- Single-Line REPL: A fast command-line at the footer for quick one-off commands and API queries. Entries here are saved in a Command Cache; use the Up and Down arrows to cycle through your history.
- Multi-Line Workspace: A dedicated scratchpad for longer snippets and logic prototyping. It features a standalone Run button and supports
Ctrl + Enterfor execution.
[!NOTE] While the Multi-Line Workspace supports the same "magic" syntax as the single-line input, entries written here are not saved in the arrow-key Command Cache. This is because the workspace provides full Load, Save, and Save As file operations, allowing you to persist your logic as pure
.csfiles instead of relying on a volatile command history.
File Management
Unlike Modular Projects, scripts for the multi-line REPL do not require a specific folder structure. You can Save and Load pure .cs files from any folder on your machine, making the REPL the ideal environment for rough drafts and scratchpad logic.
Mode Switching
- Expanding: Clicking the expand icon transitions the UI to the Multi-Line Workspace, removing the single-line input to maximize the editor area.
- Collapsing: Collapsing the workspace removes the larger editor and restores the Single-Line REPL at the footer, providing a streamlined view with maximum Console History visibility.

The Interactive Workflow
The REPL operates on a "Read-Eval-Print" cycle. You write pure C# code (no classes or namespaces required) and execute it instantly in the active Revit session.
1. Instant Execution
- Single-Line: Type your command and press Enter.
- Multi-Line: Click the Run button or press
Ctrl + Enterto execute the entire workspace.
2. Syntax & Discovery
Both modes are designed for speed, but follow specific rules to ensure successful execution:
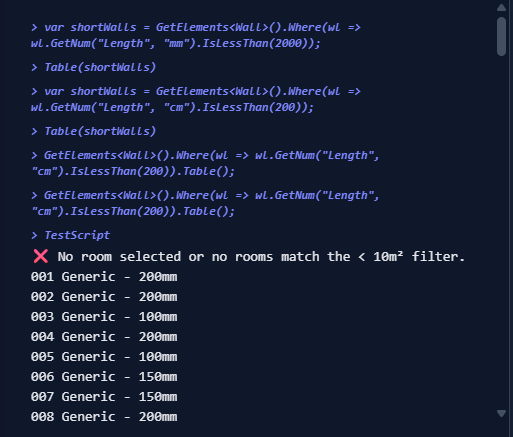
- Semicolons: Mandatory for variable assignments (
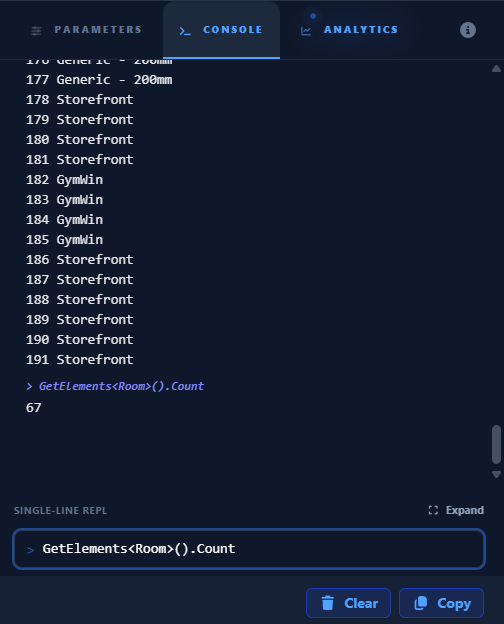
var x = 10;), but optional for one-liners and queries (Selection.Count). - Count vs Count(): Use the
.Countproperty for immediate lists (e.g.,Selection.Count,GetMagicNames().Count) and the.Count()method for dynamic enumerable queries (e.g.,GetElements<Wall>().Where(w => ...).Count()). - Magic Discovery: Use the Magic Accessors for direct and simplified property access.
3. Shared Context & Multi-Turn Interaction
Both modes share the same persistent execution environment. This means you can initialize complex data in the Multi-Line Workspace and surgically query it later from the Single-Line REPL.
Because the environment is persistent, you can define a variable in one turn and reference it in the next:
// Multi-Line Workspace (Turn 1)
var rooms = GetElements<Room>();
Println($"Found {rooms.Count} rooms");
// Single-Line REPL (Turn 2)
rooms.Table().Select(r => new { r.Name, r.Area })
Global Reference
These objects and helpers are globally injected into every REPL turn.
| Object | Type | Description |
|---|---|---|
Doc | Document | The active Revit database Document. |
UIDoc | UIDocument | The Revit UI Document (active window). |
Selection | List<Element> | Elements currently selected in the Revit viewport. |
Println(msg) | void | Formatted console output with string interpolation support. |
Parameter & Property Accessors (Extension Methods)
Paracore extends standard Revit elements with "Magic" accessors that handle unit conversion and identity resolution automatically.
Reading Data
| Method | Returns | Notes |
|---|---|---|
GetStr(name) | string | Smart resolution: returns the Name if the parameter is an ID (e.g., Level). |
GetNum(name) | double | Returns raw internal units (feet/sqft). |
GetNum(name, unit) | double | Converts internal units to requested unit (e.g., "mm", "m2"). |
GetVal(name) | string | Returns the formatted string exactly as seen in the Revit Properties palette. |
Writing Data
| Method | Description |
|---|---|
SetVal(name, value) | The Smart Setter. Automatically parses units, IDs, and strings. |
SetNum(name, num, unit) | Explicit unit-aware numeric setter. |
Magic Discovery
Use these high-level accessors to instantly find elements by name, category, or class.
// Single-Line REPL examples
var doors = GetElements("Doors");            // All door instances
var types = GetElements<FamilySymbol>("Doors"); // All door types
GetElement("Level 1").Select()              // Chain with Select()
GetMagicNames().Count                        // Total number of magic names
GetElements<Element>()                       // Universal Accessor: Target everything

// Use the new Fluent extension
Println(Selection[0].FamilyName())
Since Element is the base class for all Revit objects, calling GetElements<Element>() is the most powerful way to perform bulk audits or search for data across the entire model.
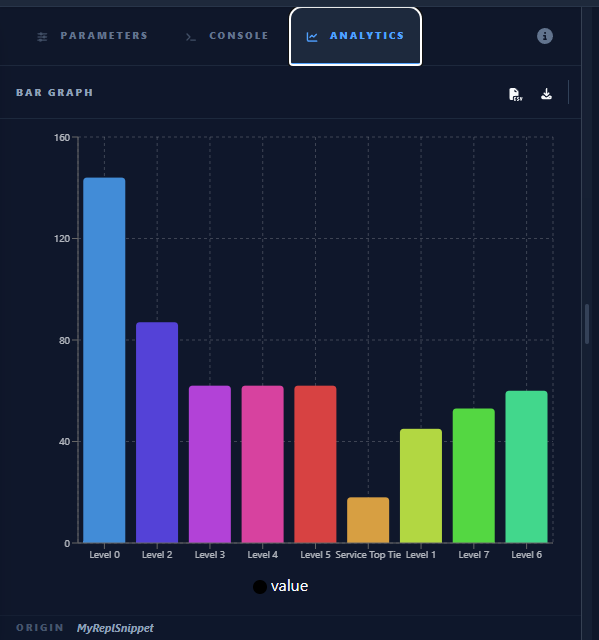
Visualization API
Pipe your data directly into the Analytics Tab for interactive analysis.
| Command / Method | Type | Description |
|---|---|---|
Table(data) | Global | Renders a grid. Returns void (not chainable). |
.Table() | Extension | Renders a grid and returns the collection. Chainable. |
.PieChart() / PieGraph(data) | Both | Renders a high-contrast pie chart (Auto-maps keys to labels/values). |
.BarChart() / BarGraph(data) | Both | Renders a high-contrast bar chart (Auto-maps keys to labels/values). |
.Select() / .Zoom() | Extension | Chain these to any collection to select or focus elements. |
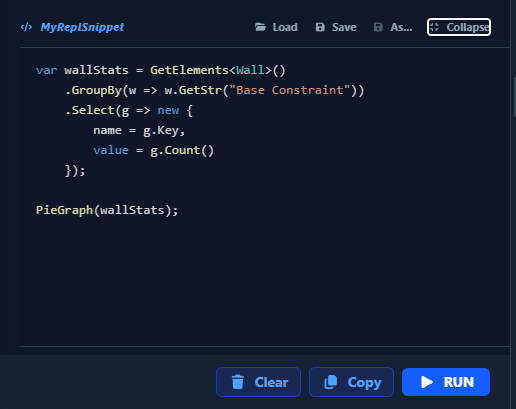
// Multi-Line Snippet (Workshop)
// Create the "Walls per Level" bar graph shown above
var data = GetElements<Wall>()
    .GroupBy(w => w.GetStr("Base Constraint"))
    .Select(g => new { Level = g.Key, Count = g.Count() });

BarGraph(data);
Example Recipes
1. Element Audit
Find elements more than 1000m from the origin (likely misplaced or CAD import artifacts).
var limit = 1000.InputUnit("m");
var lost = GetElements<Element>().Where(e => {
    var bb = e.get_BoundingBox(null);
    if (bb == null) return false;
    var center = (bb.Min + bb.Max) / 2.0;
    // Semantically clear: Distance from one point to another
    return center.DistanceTo(XYZ.Zero) > limit;
});
if (lost.Any()) {
    lost.Select().Zoom()
    Selection[0].Peek()
}
2. Room Data Sync
Copy the Room Name to the "Comments" of every door hosted within that room.
// Multi-Line Snippet (Workshop)
Transact("Sync Room Data", () => {
    foreach (var door in GetElements<FamilyInstance>("Doors")) {
        var room = door.Room ?? door.FromRoom ?? door.ToRoom;
        if (room != null) door.SetVal("Comments", $"In: {room.Name}");
    }
});
3. Quick Area Chart
Visualize the distribution of Room areas by Level.
// Multi-Line Snippet (Workshop)
var stats = GetElements<Room>().Where(r => r.Area > 0)
    .GroupBy(r => r.GetStr("Level"))
    .Select(g => new { Level = g.Key, Total_Area = g.Sum(r => r.GetNum("Area", "m2")) });

PieGraph(stats);
📖 Full API Reference: For an exhaustive list of every available helper, parameter accessor, and unit conversion method, see the Paracore Extension Methods.